Tuesday

Easy Garbanzo Beans Salad

channa salaadn1

It was a lazy Saturday afternoon and I was trying to organize the things in my pantry, to make my grocery list for the week. I came across this tin of pre-cooked Garbanzo beans sitting quietly in a corner. My first thought... "Let me get this out and see what I can turn it into". My problem - one can of beans - too less to make a curry, and too much to eat it as is. So I adapted Geeta Balsekar's recipe for Chick Pea Salad from her book Vegetarian Cooking for a healthy evening snack.

The original recipe called for onions and spring onions, however I decided to stay away from it. In her recipe, she uses vegetable oil to bind everything, while in mine I used Light Mayo and a dash of dried mint to enhance the flavor.

This recipe is perfect for a quick healthy protein loaded snack...perfect for summer time and when old man winter arrives.

Ingredients:
3/4 cup pre-cooked/canned, strained Garbanzo beans
1/4 teaspoon chaat masala
1/2 teaspoon lemon juice
1/4 teaspoon fresh crushed cumin
1/4 teaspoon cumin powder
1/4 teaspoon dry crushed mint
1/4 teaspoon red chilli powder
1/2 tablespoon Light Mayo
1/4 cup diced tomatoes
1 teaspoon of finely chopped cilantro

Method:
Add garbanzo beans into a salad bowl. Add in all the other ingredients. Mix well. Garnish with freshly ground black pepper.
Serve.

Optional: You could refrigerate for 30 min, if you prefer it chilled. Alternately you could warm in the microwave for 1 min, if you'd prefer mildly warm.

Monday

Sungtaa Theek Randhai - Tomato & Spice Sauteed Shrimp

sungta theek randhai n1

"Sungtaa Theek Randhayi" (Shrimp Spicy Curry) has always been a favorite at home. It’s super easy and hardly takes more than 35 min to fix this semi dry curry. My Mom's amazing at this! I could put this on top of the list of my Dad's & my Uncle’s favorites when it comes to sea food. Ever since I introduced this to my Husband and my Father-in-Law they don’t seem to be tired of it...not even a bit...no exaggeration here! ( Thanks Mummy :) )

I call this Randhayi (curry) the perfect culmination of the heat from the red chili powder , the tart from the tamarind and the fragrance from the asafoetida. Its foundation probably rests on the Tomato pickle, made in many Konkani households (or so I would guess).

When you really need a break from the coconut in sea food prepared the authentic Amchi style or are looking for alternate methods to cook shrimp, this Theek randhai certainly comes handy.

No kidding.....Check it out yourself.....

Ingredients:
1 lb shrimp, uncooked, de-veined, tail-off and cleaned
(I choose frozen fresh water shrimp)
2 teaspoons Turmeric powder
2 tablespoons cooking oil
1 teaspoon Mustard seeds
1 teaspoon Red chili powder
(Varies depending upon level of spice, the level of the one I use is hot)
1 cup Tamarind pulp
1 cup diced Tomatoes
1/2 teaspoon Asafoetida powder
3 cups water
Salt to taste

Method:

1) To 3 cups of water in a wok, add shrimp and turmeric powder. Bring to boil and cook until well done. This is something my Mom usually does, to ensure the shrimp is cleaned well and kill any bacteria - I presume. Strain the shrimp and set aside.

The above step is purely optional. If you’d prefer, after giving the shrimp a quick wash in running water, you could directly proceed to step 2, and avoid step 1.

2) In a wok, heat oil (about 300F on a thermometer) and add mustard seeds. Allow to splutter. (Caution: Avoid hurting yourself with spill). Add in tomatoes, sauté till it softens in oil.

3) Add red chili powder and asafoetida powder, sauté for 3-4 min. Toss in the cooked shrimp and add salt as per taste, sauté for 4-5 min. Pour the tamarind pulp into the sautéed mixture. Bring to a slow boil, with covered lid for 8-12 min.

4) Cook without lid, for 8-10 min, till the curry condenses into a semi dry consistency.

Serve hot with yummy Dalitoy and rice. An alternative could be Rasam/Saaru/Sambhar and rice.

Note: Making the Tamarind Pulp
I like it thick, so this is what I do. You could alter it based on the acid /tart level you'd prefer.

1 lemon sized (medium) Tamarind ( Indian and not Thai version)
1 cup water

Microwave the tamarind in 1/2 cup water for 1 min. Allow to cool to room temperature and mash the tamarind into the water to extract the pulp. Strain the pulp and set aside. To the remnant Tamarind, add 1/2 cup of water and repeat the process as above. In all you would get about 1 cup of Tamarind pulp. I refrigerate the amount I haven’t used for up to 36 hrs.

Enjoy!


Sunday

About Chow from the Family Kitchen


There are certain things you are good at and certain things you are not. I’m not an inch as good as my Mom or both my Grandmothers when it comes to cooking. To me spending time in the kitchen meant bonding with each of them. Offering to lend a hand in the kitchen has always been an excuse I used and continue to use -its been my way of learning from them how to do things right and at the same time be their ‘official critic’ :) I've always loved every bit of it and can't wait for a trip home for that.

Be it my Mom’s or Bapama’s (paternal grandmother) or Mouma’s (maternal grandmother whom I fondly call Mouma) kitchen, apart from helping out with the vegetables and dishes, I always landed up creating a mish-mash of ingredients that I called “my invention”; sometime palatable, but sometime not. You could hear them going from…"Kassa kartha go chalda tu” (what are you doing child?) ….to “Nutha bastha ve ek kadena!”(Could you just sit down and stay put?).

Over the years my experiments in the kitchen have grown larger in scale, and in the process I developed my own approach towards cooking- very different from theirs. Nonetheless, I 've gotten to learn a great deal about traditions, rituals,cooking and food as a whole by just being around them in the kitchen. It’s indeed been this dash of love they add thats made all the difference.

Although Mom, Mouma and Bappama have tried out so many things – similar and different- I discovered that they are all very unique in their styles of cooking. None of them share a technique, despite the fact that they share recipes. They are each distinctive in what they cook.

I cannot really classify Mom’s cooking under one category because every where we've traveled she has incorporated one dish from the region into our weekly menu- and whatever she cooks she's fabulous at it; while Mouma’s kitchen has traditionally been Konkani , Bapama adds a flavor of Andhra cuisine into hers.

Alternatively, my MIL's kitchen is more of a combination of authentic Konkani and Dakshin Kannada cuisine. (There you go the 4th style of cooking right in my backyard!) My Aunts also share the same style as that of her.
My MIL's cooking is way different from my Mom’s and has an essence of coconut in most of her curries. Both of them do their share of exchanging recipes and experimenting. (So I’m not the only one!) That way I get a double dose of the same ingredients..... though the outcomes may be different....if you know what I mean.

Than just being friends, two people have been more family to us. One introduced me to Italian and French cooking while the other to Tamil cuisine.

In all, a trip home implies a “Series of Feasts” for the palate, that of both my husband and myself.

As an effort to cherish and savor the taste of the cooking of all these terrific chefs in the family, for life, I’ve been thinking (for a long time now) to have a compilation of all their recipes in my recipe box. But then with the advent of the digital camera and Blogger, I decided to ...you guessed it...Start a Food Blog....jump into the bandwagon....and have fun along the way as I document Amgele Gharkadche Rundhapp..... in other words......the Chow from the Family Kitchen!

Wednesday

Rasmalai

Rasmalai

Rasmalai has been one of my favorites since childhood. If you are new to Indian cuisine, Rasmalai is another name for cheese balls soaked in creamy sugary milk. Traditionally served at the end of a meal, you could find it listed under the section for desserts on a classic Indian menu. It is believed that Rasamalai has its roots in the Eastern Indian state of West Bengal. However for me, it is something I associate with Nathu’s in New Delhi or KC Das in Bangalore - especially the ones that came in "take away" earthern clay pots.

Over the years I’ve tried out the ones available in this part of the world - both frozen and those from the Indian restaurants; though not completely satisfied, I 've learnt to be contended, for the lack of better alternatives.

A while ago, we had friends Reji & Rajeev over for dinner, and that‘s when Reji asked me if I had ever tried making Rasmalai at home? I said that it was a tedious task and certainly out of the league for amateurs like me to experiment with. However her question sure got me thinking if it was all that difficult at all?

I was talking about this with Linda, my friend from work who happens to be an enthusiast of Indian food for over 20 years. Linda and I have shared our reviews on various restaurants/cuisines, both Indian and otherwise. Our conversations have historically been more regarding food than work:) So, who best than Linda to ask, I thought!

She sure surprised me when she mentioned that she had tried it out once a long time ago with riccota cheese and that it wasn’t rocket science, but she did mention it was time consuming.

Anxious and doubtful if I could do it, I decided to give it a shot. With Diwali round the corner, I felt the timing couldn't be more perfect for a first trial. So, I began browsing the compilation (of clippings) of recipes from various editions of Femina's cookery section that my mom had put together for me over the last 15 years and selected the one that seemed pretty straight forward. I simplified it further to the best extent I could to make palatable Rasamalai in the shortest time with minimal mess.

It hasnt been smooth sailing, I had some learning to do on the way. But at the end of it, I was pretty happy with the outcome...it wasnt that bad for a first try.
Linda, I cannot wait for you to get back from your trip and try it out!

It was a no brainer to have it up on my menu for the next upcoming Diwali potluck and the first entry for desserts on my chow chronicles. Here it is...my version of a quick and easy way to "home made Rasmalai" from start to finish.


Ingredients
5 cups Milk (2% reduced Fat, Organic)
1 cup Sugar
1 cup Milk powder (Dry, Non fat)
1 Egg White beaten (No Yolk)
½ teaspoon Baking Powder
1 teaspoon Crushed and powdered Cardamom seeds
¼ teaspoon Saffron soaked in 1 teaspoon of milk
¼ cup coarsely powdered Unsalted Pistachios, Unsalted Almonds/ Unsalted Cashew nuts
5 medium sized Unsalted Cashew nuts soaked in ¼ cup water and ground to a paste. ( Make this fresh just before your start)

Method:
In a large wok, boil milk, sugar together by stirring continuously, on medium heat. Make sure you leave a wooden or stainless steel ladle in it , so that the milk does not char. ( It requires a ton of patience.....but its worth it ..trust me). Slowly blend in the cashew nut paste and keep stirring continuously. The milk mixture must condense to at least half its initial volume.

Sieve together baking powder and milk powder into a mixing bowl. Fold in the beaten Egg white into this powder mix. Gently fold the egg white into the mixture. Do not whip or beat or knead!

Roll out small balls of the egg white-baking powder-milk powder mixture. Flatten it a little by cupping in between your palms. The mixture proportion I’ve mentioned makes about 5 balls.

Slowly release each of these lightly flattened balls into the milk-sugar-cashew nut paste mixture, bring to boil on medium flame for 2-3 min. Make sure that the balls sink into the milk mixture. Stir gently if needed. Remove from heat.

Add powdered cardamom, coarsely powdered pistachios and almonds. Gently mix. Add in the saffron along with the milk it was soaked in. I ususally like this as a garnish because I'm a saffron fanatic.

Transfer the Rasmalai into a large serving dish. Keep the dish in a water bath at room temperature. (The way you do this is: Take a dish bigger than you serving dish. Fill it to half with regular water. Place the serving dish with the Rasmalai into this water bath). Allow to cool to room temperature.

Refrigerate (Do not Freeze) for 2-3 hours or till ready to serve. Serve Chilled.

Give it a try and do let me know if there's a more simpler way to make it!


Friday

Thai Flat Noodles with Chicken

thai noodles

My husband introduced me to Thai cuisine a couple of years ago. He took me a renowned Thai restaurant in the suburbs – his favorite then - as I wanted to give Thai food a try. I must confess, I am not someone closed to new things....especially when it comes down to food...but then I had a set of preconceived notions from the reviews I’d read about Thai food. I realized that either people loved it or hated for numerous reasons - it’s too spicy, it’s overloaded with coconut, too greasy, at times too sweet and or it has an overpowering smell of fish sauce. Interestingly the perspectives of most reviewers were based loosely around all of these factors.

Astonishing and contrary to my belief, it took me a while before I became an ardent fan of Thai food. Not that I didn’t enjoy it the first few times, but in retrospection, may be the coconut, tamarind and turmeric made me feel more close to eating a regular home cooked meal or may be I was too overwhelmed by the reviews. Well, now that I have “evolved” :-) I can admit that it’s been nothing short of a ‘tradition’ to visit a Thai place at least once every month. Thanks Hun for getting me hooked on to Thai food! No matter how many times we’ve eaten Thai food already, I‘ll always relish it! And I'll forever love you for it.
My husband has a few favorites: Panang Gai, Thai Flat noodles and Pad Thai and I’ve observed that he’s happy to choose from among the three. I however, have been trying different things each time, just to savor the assortment of flavors that Thai cuisine has to offer. After a few visits, I told myself that there must be something in the Thai Flat noodles that makes him eat it time and again. So, I decided to go for it. Loaded with red peppers, crushed peanuts, bean sprouts and chicken tossed in soft flat noodles and cooked to perfection, it was fabulous. The nutty taste of the peanuts came together wonderful with the heat from the red peppers, the crunch from the sprouts and the tang of sesame oil. Too good to say NO to? You bet.

Not long after I began introducing my friends to the Thai Flat noodles at this place, preaching that it was “Alright to drive a good 35 miles one way to eat because this flat noodles is really worth the drive”, the restaurant relocated due to change in management…a bummer .....definitely!!! Sadly, my acquired fondness for the Thai Flat noodles made me hunt for alternatives. That’s when I began browsing aisles at grocery stores that carry Thai ingredients and produce. After a zillion experiments , a thousand protocols, one hundred abortive attempts and tens (or should I say tons) of dull outcomes…I was able to figure out a undemanding recipe to make Thai Flat noodles to gratify my longing. Its been a year now since our favorite Thai place relocated out of town, to cherish its memory I decided to include this on my chronicles for the week. So here it is from my Thai experimental log to yours….
Choc-tee!

Ingredients
1 cup wide Thai rice noodles
1 tablespoon fish sauce
2 tablespoons dark soy sauce
½ cup green onions (julienned)
½ cup Bean Sprouts
½ cup Red Peppers (julienned)
2 tablespoon sesame oil
¼ cup crushed peanuts
1 egg, beaten
1 tablespoon of finely chopped Thai Chili peppers
Salt to taste
Marinade
½ tablespoon minced garlic
1 tablespoon of finely chopped Thai Chili peppers
1 tablespoon rice wine
1 tablesppoon of fish sauce
1 teaspoon freshly ground black pepper
1 teaspoon minced ginger
1 ½ cups chicken thighs ( boneless, skinless) and cut into ½ “ cubes
Method
Add all ingredients for marinade into a zip top bag. Mix contents well so that the chicken is evenly coated. Set aside at room temperature for an hour. Cook noodles (I use the method specified on the package) till soft in warm water. Add a drop of oil and salt while cooking the noodles to prevent each noodle from sticking to another. Drain out water and toss the noodles into ice cold water to prevent further cooking. Heat sesame oil (350F) in a wok, add the Thai Chili peppers and marinated chicken. Stir fry till done. Now add beaten egg and scramble. Next throw in the veggies and the sauces, sauté till done. Add salt to taste, mix in the noodles.
Finally add crushed peanuts, toss well and cook for 2-3 min. Serve hot.
Note
For all you Basil lovers, toss in a few fresh basil leaves along with other veggies and stir fry. For those of you with nut allergies, avoid peanuts and add ¼ cup of crushed manchow style noodles (fried). Veggie lovers can substitute chicken with Tofu or bean curd.

Tuesday

General Tso’s Chicken

GeneralTso n1

A stop at an Asian fusion bistro was something that was added arbitrarily to my list of weekend “To Dos”. Tired after running errands in the scorching Texas sun, a sip of Mango Ice Tea was more than just refreshing!

After a 15 minute scan of the items listed in the Menu, I finally dared to give up my favorite Kung Pao Chicken for the Hunan style General Tso's chicken - something that I had been wanting to try for a while. Though not quite sure what I was getting into or who General Tso was, I decided to kick the spice level up a notch to a "High" from my regular "Medium". The lady taking down my order rolled her eyes and repeated “Did you say High?"...making sure she heard me right!!

Awaiting my complimentary bowl of Hot & Sour soup with crispy noodles, I was mentally trying to figure out how good or bad would General Tso's Chicken be! With a ferocious name like this, I imagined the chicken to be superrr spicy. "Of course I had just been eating nothing but Kung Pao for years now from the American-Chinese cuisine, so how was I going to guess", I convinced and prepared myself for the worst.

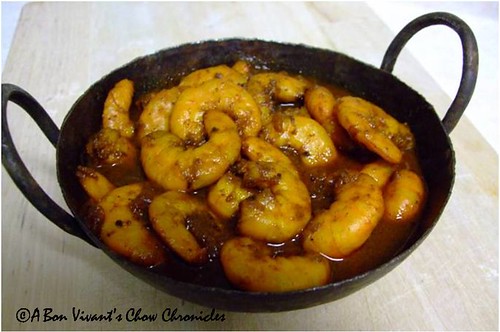
The wait seemed longer, though it just took 10 minutes, for the General Tso's chicken to finally arrive. I began scrutinizing from the first glimpse I could catch while it was placed on my table. It seemed very different from Kung Pao, no peanuts, more sauce, no veggies, decadent chicken with nice big red chillies. With all senses alarmed, I gathered courage to dive into that first bite of Tso's chicken. And boy! Was it brilliant or what!

With an impeccable balance of sugar and salt, this crispy chicken had just the right flavor without the over powering effect of soy sauce. And yes, the spice level was just perfect for me. Yum! It was simply delicioso!

I fell in love with Chinese food all over again with General Tso's chicken. Now, did someone say "change" is the essence of life:)

Thrilled to have made a sumptuous choice, I got back home to only to reserve an online copy of a cookbook loaded with Asian cuisine, at the local Public library. There it was my recipe to General Tso's chicken hidden amongst its Schezuan cousins. I also began asking friends at work about a good recipe - as an alternative. A few of them narrated their versions of the recipe and I noted down each one of them - religiously:) ; I tried permutations & combinations too, till I finally had my own version that created the same lasting impression on me as that from the Asian fusion bistro.

What best place to document my first experience and my version of General Tso's than the chow chronicle....

Ingredients

For the chicken
¾ lb Boneless, Skinless Chicken Thighs
1/3 cup Soy sauce
¾ cup Corn Starch
1 egg, beaten
1 ½cups Canola Oil

For the Sauce
½ cup Corn Starch
¼ cup water
½ tablespoon brown sugar
½ teaspoon iodized Salt
¼ cup Soy Sauce
¼ cup white vinegar
¼ cup Sherry Wine
1 can low sodium Chicken Broth
1 teaspoon Ginger powder
1 teaspoon Garlic powder
4 dried medium sized Red chilies
2 tablespoon Sesame oil
1 tablespoon Orange juice (Optional)

Method

For the chicken: Cut chicken into inch long cubes. To a zip top bag (Large) add soy sauce, and beaten eggs, close and shake well to get an even emulsion. Add pieces of chicken into the emulsion close the bag and mix well (inside the bag by slow tossing). To a second zip top bag add ¾ cup of corn starch. With kitchen tongs, remove pieces of chicken, one after the other, and add into the corn starch. Make sure to coat well. Heat oil in a wok, tap off excess corn starch and add pieces of chicken into the wok. Fry pieces of chicken in hot oil (325 degrees on the thermometer) until golden brown. Drain excess oil using paper towels.

For the sauce: Mix all of the following in a zip top bag: cornstarch, water, sugar, salt, soy sauce, ginger powder and garlic powder. Make sure no lumps are formed. Add in white vinegar, sherry whine and chicken broth and mix well by shaking the ziptop bag. Heat Sesame oil in a wok ( to around 390 degrees) , add dried red chilies. Stir fry for a few seconds. Stir in the sauce mixture. Cook till the sauce condenses (thickens). Avoid lumps and stir to prevent the sauce from turning gooey and extremely thick. Throw in pieces of chicken (previously prepared) into the sauce. Cook till you get a “close to gravy” consistency. Serve HOT with brown rice.

Tips: I opt to choose white meat chicken thighs to dark meat chicken or chicken breasts, to avoid high absorption of oil on frying. For ease of cleaning and lesser mess I prefer using zip top bags for marinating/mixing. Bowls/ Jars serve as ideal substitutes. For the scent of orange, give it a flavor of the orange glaze by using Orange juice. Store bought White wine could be used in place of Sherry Wine. To make General Tso’s chicken less sweeter and salty, go easy on the sugar and use low sodium chicken broth. Fresh minced garlic and ginger are certainly more aromatic than powdered versions. For a delightful entrée serve with fried rice or brown rice. Cook brown rice in chicken broth to enhance its nutty flavor.

Most Important Chow Tip for General Tso’s chicken:
No matter what time of the day it is eaten, General Tso’s chicken must be served hot to avoid the gooey taste due to the corn starch. Add a little water while re-heating (preferably in a wok and not microwave) if the sauce is too thick.

Sunday

Pão de queijo – Brazilian Cheese Rolls

pdq n1

No visit to a Brazilian Churrascaria (Steak House) is complete without trying the authentic Brazilian cheese rolls - the “ Pão de queijo” .

These melt in your mouth cheese rolls are crispy from the outside and soft-to - gooey on the inside, when served warm. Originally served as a snack with coffee or breakfast in Brazil, they are what I call a “Perfectizer” ... perfect appetizers ..more so when you throw a party and prefer not to stuff your guests with just the first course! How good can it get! Its gluten free/ wheat free and made from tapioca starch!

Be it at Fogo De Chao or Texas De Brazil or Rafain, though the highlight always remains the various cuts of meats served by Gauchos, ranging from – Picanha ( Rump Cover), Pork, Chicken, Fraldinha (Bottom Sirloin), Filet Mignon, Lamb & Brazilian Sausage- these cheese rolls have eternally held a special place in my list of “Favorite chow” . My love for them just seems to be increasing with every visit.

So after a recent visit I decided to google for recipes and found a plethora of them. Not sure which one would give me the authentic taste, I decided to ask a couple of friends from Brazil. Surprisingly one of them was not only kind to share her mother’s recipe, but also make a whole lot of them for me!

We had a bunch of friends over one Friday evening, and I thought what best than try out my friend's mom’s recipe. So I planned this to be paired with aged Merlot so that mildness of the cheese in the roll is balanced by smoothness of Merlot.

And Lo!! Before I even realized, I was turning out batches of these little rolls - more than I had ever imagined. Honestly, I had my own apprehensions as to how it would turn out, I certainly didn’t want a disaster in my kitchen minutes before my guests arrived! So I did have back up plans of store bought munchies...you know just in case.

But, thanks to my friend and her mom, I was sitting that Friday evening as an extremely happy hostess sharing the recipe with my guests – contended with the fact that I had done justice to my Pão de queijos! So folks here I present to you my “perfectizer” of the week...


Ingredients & Method

1 cup of water
1 cup of milk ( 2% reduced fat)
½ cup oil ( canola oil)
1 teaspoon of salt ( iodized)
1lb of tapioca starch
2-3 eggs ( large)
7 oz of grated parmesan cheese


Boil in a wok the following: water, milk, oil and salt. Remove the wok from heat and sift in the Tapioca starch. Add grated cheese into the above mixture and knead well. Allow to cool to room temperature. Add eggs , one at a time, into the mixture and mix well using a wooden spoon. Knead the mixture into a smooth textured dough. Allow the dough sit for 30-45 minutes at room temperature. Shape spoonful of the dough into small balls ( lemon sized) by rolling with hands. Preheat oven to 350F. Place the balls of dough atleast ¼ inch apart on parchment paper or greased baking sheet. The cheese rolls will become twice their original size when done. Bake in the preheated oven for 15-20 minutes until golden brown. Stick in a toothpick/ fruit fork into some the rolls, if it comes out clear the rolls are done. Allow time to cool. Serve warm.

Some Tips:
If using medium sized eggs, then you may want to use 4-5of them. Mixing /kneading by hand gives a far smoother texture to these rolls. Grease your hands/ table spoon with oil before making the balls to prevent sticking. Place the balls well apart from one another to prevent sticking to each other when done. Enjoy with your favorite wine. Add some finely chopped jalapeno to add some spice- if you prefer.

Chow!!

Friday

About

To food as a whole ...from the selection...to the first sight....the enticement… to that final Yum-Ho!!! moment, I find it essential to cherish it as the product of an entire " see - smell- taste- rejoice " package.

Be it an humble entree or gourmet bread, aged Merlot or a mind blowing Bloody Mary, a peaceful Angel cake or a rocking Rocky road fudge - every mouthful leading to sheer bliss is what makes it - not just a memory to recall but an incentive to relive the experience.

Exploring food, to me, is a continuous journey not just through woks and taverns, but through condiments and traditions.

So, welcome to my chow chronicles.....an "e-journal" of my experiences , views and recipes ...as I travel through the world of food!

Chow!!

-Eskay


COPYRIGHT

All rights reserved. All text and photographs are a copyright of © A Bon Vivant’s Chow Chronicles. No content, inclusive of text and photographs, will be republished, broadcast or distributed otherwise, without prior written permission from Eskay.

Design By Webtalks | © 2007-2009 Eskay- A BonVivant's Chow Chronicles